Friday, August 12, 2016

Part 2: Multiplayer WebSocket Game server written in C using libuv & libwebsockets & Cocos2d-x-HTML5

Assuming the compilation of the server went as expected and the exe file did created.
You can start it clicking F5 in Visual Studio , the server will be listening for incoming requests
On port 7681.

Few Notes About the Client Server Architecture i use it this tutorial .
As mentioned in PART 1 of this tutorial , the example here going to implement the Authoritative server ,
In short what it means is the server will not send on each client game loop verification instead of it will send to the client the game status as played in the server , and the client will current the moves according to the server status or just keep with the game flow if its vaild . the client will use something called : client prediction , what this means in short is that the client will send to the server the game info that happens , but it will not wait for the verification for each step , it will just verify that the steps before the current step are done right . ( meter of milliseconds ) .

The source code :
ws_cococs_server_main.c 
This file will initialize the libuv framework and the libwebsockets
The libwebsockets will use the libuv event loop and other services and will take command on the entire server .


 1
 2
 3
 4
 5
 6
 7
 8
 9
10
11
12
13
14
15
16
17
18
19
20
21
22
23
24
25
26
27
28
29
30
31
32
33
34
35
36
37
38
39
40
41
42
43
44
45
46
47
48
49
50
51
52
53
54
55
56
57
58
59
60
61
62
63
64
65
66
67
68
69
70
71
72
73
74
75
76
77
78
79
80
81
82
83
84
#include "game_handler.h"
#include <uv.h>

int debug_level = 7;
struct lws_context *context;
#define MAX_ECHO_PAYLOAD 1024
static uv_timer_t timer_handle;
static int timer_cb_called;
static uv_once_t once = UV_ONCE_INIT;
static int once_cb_called = 0;
static int repeat_close_cb_called = 0;
static int once_close_cb_called = 0;
static int repeat_cb_called = 0;
static struct lws_protocols protocols[] = {  
 {
  "wsapi",
  callback_wsapi,
  sizeof(struct per_session_data__apigataway),
  MAX_ECHO_PAYLOAD,
 },
  
 { NULL, NULL, 0, 0 } /* terminator */
};
void signal_cb(uv_signal_t *watcher, int signum)
{
 lwsl_err("Signal %d caught, exiting...\n", watcher->signum);
 switch (watcher->signum) {
 case SIGTERM:
 case SIGINT:
  break;
 default:
  signal(SIGABRT, SIG_DFL);
  abort();
  break;
 }
 lws_libuv_stop(context);
}

int main(int argc, char **argv)
{
 struct lws_context_creation_info info;
 const char *iface = NULL;
 int opts = 0;
  uv_loop_t* loop = NULL;
 /* tell the library what debug level to emit and to send it to syslog */
 lws_set_log_level(debug_level, lwsl_emit_syslog);
 lwsl_notice("About to start server\n");

    memset(&info, 0, sizeof info);
 info.port = 7681;
 info.iface = NULL;
 info.protocols = protocols;
 info.extensions = NULL;
 info.ssl_cert_filepath = NULL;
 info.ssl_private_key_filepath = NULL;
 info.gid = -1;
 info.uid = -1;
 info.max_http_header_pool = 1;
 info.timeout_secs = 5;
 info.options = opts | LWS_SERVER_OPTION_LIBUV;

 context = lws_create_context(&info);
 if (context == NULL) {
  lwsl_err("libwebsocket init failed\n");
  return -1;
 }

 lws_uv_sigint_cfg(context, 1, signal_cb);
 if (lws_uv_initloop(context,NULL /*loop*/, 0)) {
  lwsl_err("lws_uv_initloop failed\n");

  goto bail;
 }

 lwsl_notice("server started\n");
 lws_libuv_run(context, 0);

bail:
 lws_context_destroy(context);
 lwsl_notice("server exited cleanly\n");


 return 0;
}

Lines 14 - 23:  libwebsockets part of it configuration we can define several protocols
Line 16: this is the uri which the client will call the web sockets request.
Line 17:callback_wsapi is the name of the main function which receive the client request.
Line 18:the size of the data structure which will hold the session data 
which means that each protocol can capture our request and process it
we are going to use only 1 protocol which process our web sockets requests
the HTTP hand shack authentication will be handled automatically by libwebsockets .
Lines 24 -35: callback which be called in case of context initialization failure . (line 68)
Lines 39 -84: configuration of libwebsockets
Line 50: server port
Line 60: configure libwebsockets to use libuv as its networking layer .

Continue to PART 3 server code


Wednesday, August 10, 2016

Part 1: Multiplayer WebSocket Game server written in C using libuv & libwebsockets & Cocos2d-x-HTML5

The motivation to write this 6 part set of tutorials is to show developers how to build fast websockets game server Written in C using open source frameworks . and Cocos2d-x the HTML5 version for the  game client.

This tutorial is only to get your feet wet in this huge field of real time game servers .
It is real simple and teach you how to make single action , that is
moving players on all clients in real time .
also there are parts which are not finished yet like GEM"S on screen , ignore them for now.


This is the end result :


You can check the source code here :
https://github.com/meiry/Tutorial_mmo_websocket_game_server_c_libuv_libwebsockets_Cocos2d-x-HTML5

I'm quite aware of the huge hype using servers like Node.js for such tasks.or even Java Netty 
Especially when choosing event based a sync single thread server .
Although they are great servers and they are proven to be robust they have bottlenecks. for example:
(Notice those are very high level claims based on my own almost 20 years of development experience ).

Node.js using V8 engine as its JavaScript interpreter which originally designed for the chrome browser. huge frameworks are written in pure JavaScript which this browser interpreter needs to chew.

Java Netty is using the java JVM which it is a Software that execute your java Software in memory or not still.The JVM do take extra server resources despite the JVM have its own fine tuning configurations the results on very high load are sometimes unexpected . and of course the GC.

Therefore I want to present option which is not so popular BUT it will  probably utilize your physical server the most. and as result will save you money. 
see games like Agar.io or slither.io their server build using c++ .

The tutorials are written to show you the basic usage of client/server connectivity , don't expect to see full blown game made . this is just a demo .
I will use the Authoritative server model and Client side prediction , to read more about it please
Please Refer to this great theoretical explanation about this model:
http://www.gabrielgambetta.com/fpm1.html
Written by Gabriel Gambetta .

The server and client is build on top and with the help of those great open source cross platform libraries:
  1. Libuv  v1.90: this is the Node.js network library which abstracts the network event based model.
  2. libwebsockets  v2.0: cross platform C web sockets library
  3. list, hashmap , array files from android-system-core : C helpers  
  4. cJSON : fast c json writer/reader
  5. Cocos2d-x HTML5 : game engine. 

The project is developed in windows using Visual Studio  2013 c++  for the server.
And Chrome browser for the client .
Latter on i will add Linux and Mac support all code is cross platform .

Lets start with downloading libuv and libwebsockets and configuring them for compilation then compiling the server frameworks , after that we will learn the game server logic. and build simple client.

1. Libuv compilation.
Download libuv from the link below or git clone the master repository from here :
https://github.com/libuv/libuv
Then open the VS2013 x86 Native Tools Command Prompt  which located in the visual studio 2013
Tools directory .
browse to the libuv root directory and execute the vcbuild.bat :


After its done , it will create the VS Sulotion file in the root dir , open VS and load uv.sln
Then befor compiling go to Libuv -> right click -> properties -> C/C++ -> Code Generation
And chnage it to /MDd


Compile !
It create the libuv.lib file located in :
libuv\libuv-1.x\libuv-1.x\Debug\lib\libuv.lib
2. Libwebsockets compilation.
Download libwebsockets from the link below or git clone the master repository from here :
https://github.com/warmcat/libwebsockets

To configure and create the VS Solution files we will use CMAKE GUI tools , im using v3.5
Open cmake gui and point to the libwebsockets root directory .
And to the build directory where cmake will create the VS build files.
Click the configure button to revile the Cmake variables we need to feel .
It will open popup window there chose Visual Studio 2013


After the first configuration interation it will popup error window this is becose there few things we need to configure so libwebsockets work with libuv.
In the main cmake gui where its all painted in red do as follow : set the proper values

LWS_WITH_LIBUV    checked
LWS_WITH_STATIC   checked
LWS_WITH_SSL         un checked
LWS_LIB_INCLUDE_DIRS = d:\dev\cpp\gamedevcraft\libuv\libuv-1.x\libuv-1.x\include
LWS_LIBUV_LIBRARIES   = d:\dev\cpp\gamedevcraft\libuv\libuv-1.x\libuv-1.x\Debug\lib\libuv.lib

Click again configure , you should see the massage : Configuration Done .


Click the Generate button , the massage : Generate done  should appear .


Now go to the build directory and load the libwebsockets.sln solution file into VS 2013.
We only need to compile websockets project . so compile it .
The product will be static libwebsokctes file : websockets_static.lib this is the file we are going to use together with libuv compiled statically to our main server application .

3.Creating the VS project for our server.

First Download the source code of the game server from this GitHub repository :
https://github.com/meiry/Tutorial_mmo_websocket_game_server_c_libuv_libwebsockets_Cocos2d-x-HTML5
These files are the logic of the game server .
In VS go to :
Open -> New Project ->Visual C++ -> Win32 Console Application ,
At the button in the same window give the project name :

I called it "libuv_libwebsocket_cocos2dx_server" , and set directory for the project.
Then press Ok .
In the Next window click the the Next button
In the third window Uncheck the "Precompiled header" and click "Finish".
Now that you created the project lets import the source files and configure the project .
Copy the files which downloaded from GitHub and copy them to the root of the new created project.
Create new directory called libs  also in the root directory
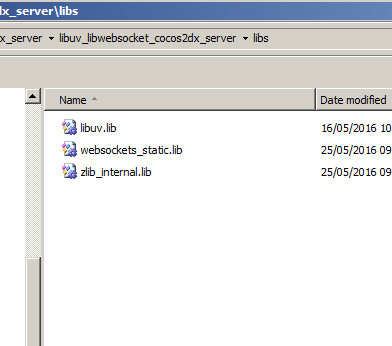
Into the libs directory copy the libraries we compiled in the previous steps (1 & 2) :
libuv.lib , websockets_static.lib , zlib_internal.lib

sources :

libs:


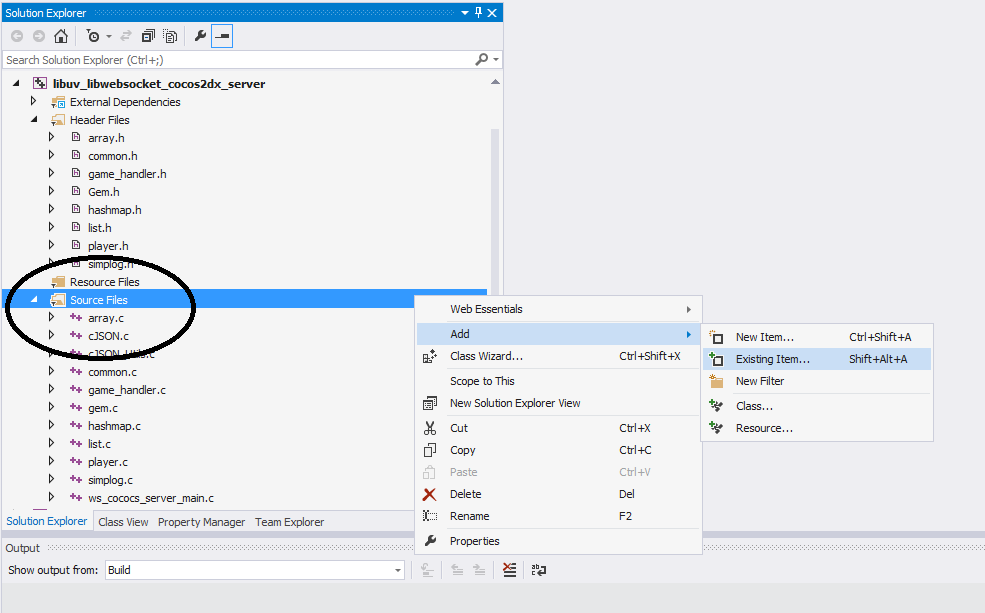
We now going to add all those libs + headers + sources files into our VS project .
Right click on the "Header Files" in the new created project in VS  go to :
Add -> Existing item
Browse to the new created project root directory  and select all the headers there


Do the same but now right click on the source directory in VS under the new project and add the C files :


You need also include the cJSON c file , so repeat the same process for the files: cJSON_Utils.c cJSON.c


Project configuration :
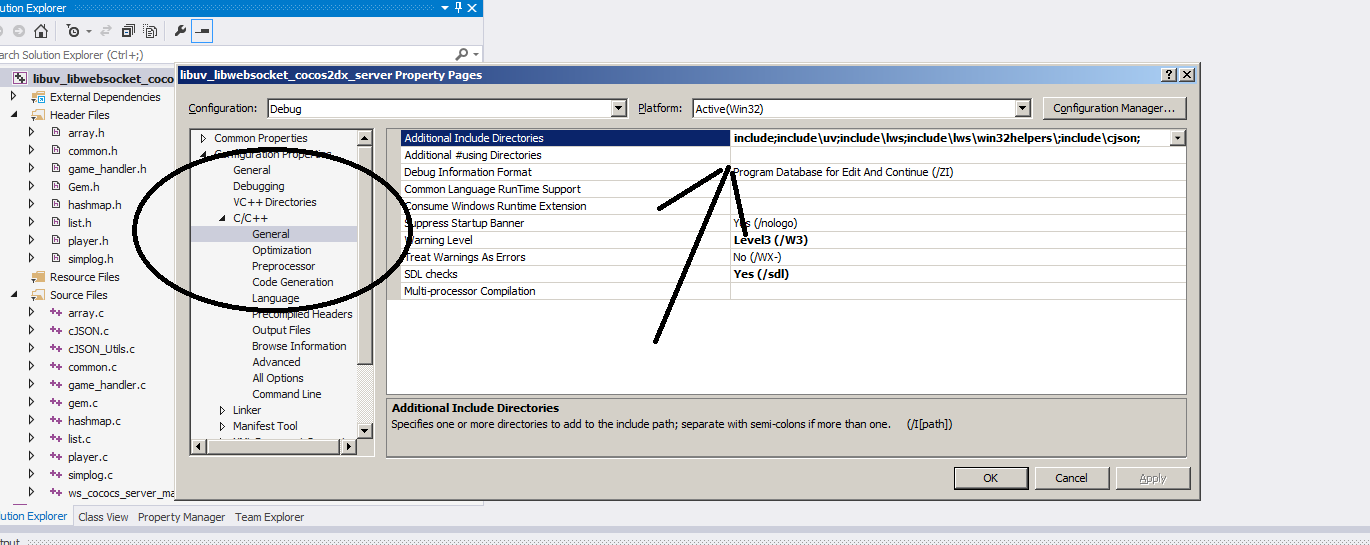
Right click on the project go to :

C/C++ -> General -> Additional include Directories :  add the headers path
include;include\uv;include\lws;include\lws\win32helpers\;include\cjson;


Then go to:
C/C++ ->  Preprocessor -> Preprocessor definitions

Verify you have those set :
WIN32
_DEBUG
_WINDOWS
_CONSOLE
_LIB
_CRT_SECURE_NO_DEPRECATE
_CRT_NONSTDC_NO_DEPRECATE

Then go to:
C/C++ -> Code generation -> Runtime library 


And verify it set to (/MDd) 


Then go to :
Linker -> General -> Additional Library Directories And add the libs directory we created in the previous step


Then go to :
Linker -> Input -> additional dependencies
And verify you have those library names ( this part will be different in Linux configuration )

advapi32.lib
iphlpapi.lib
psapi.lib
userenv.lib
ws2_32.lib
libuv.lib
websockets_static.lib
zlib_internal.lib


Then go to :
Linker ->SubSystem 
verify it set to  : Console (/SUBSYSTEM:CONSOLE)

That's all ! compile the project
You should see  build\Debug\libuv_libwebsocket_cocos2dx_server.exe  file create.

Go to PART 2 where we dive into the server source code


Thursday, March 10, 2016

How to create small C++ Cococs2d-x project in Visual Studio pointing to pre build libraries.end of the huge size projects!

In this tip  i will show you how to setup windows cocos2d-x project to be as small as possible,
From :
4.60 GB (4,940,689,408 bytes) TO  82.4 MB (86,466,560 bytes). !!

This is problem which bean around few years now and caused low disk space. and long compilation time.
Also the windows prebuild option in cocos doesn't work for me .

The simple principle here is that we will compile the cocos2d-x Libraries once.
And this will be Our central repository of lib's and dll's .
And our game EXE will compile and run localy in the project directory.
For simplicity im doing it only for DEBUG version .


  1. First we need to build the Coccos2d-x libereris , they need to created in some central place
    So my defualt project is of course the cocos2d-win32.sln which compiles also the cpp-tests
    so compile the Engine .
    d:\dev\cpp\2d\cocos2d-x-3.10\build\cocos2d-win32.sln
  2. When done , create the game project i  call it test1 and i will create it in Projects directory
    which is created in the Cocos2d-x root directory :
    d:\dev\cpp\2d\cocos2d-x-3.10\Projects\test1


    Using the cocos console command :
    D:\dev\cpp\2d\cocos2d-x-3.10\Projects>cocos new -l cpp test1
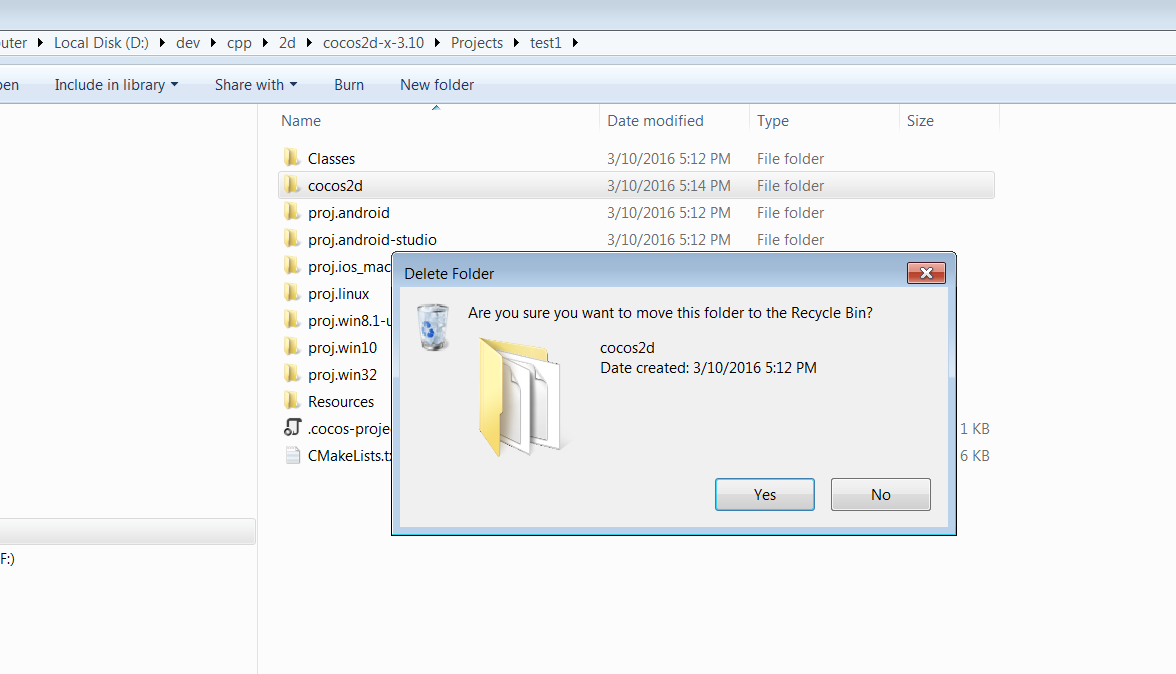
  3. First thing is delete the test1 cocos2d huge directory .

  4.  Then open the visual studio test1.vcxproj.user and test1.vcxproj 
    in your favorite text editor
    which Located in :
    d:\dev\cpp\2d\cocos2d-x-3.10\Projects\test1\proj.win32\

  5. In test1.vcxproj.user  we going to change the tags :
    <LocalDebuggerEnvironment> </LocalDebuggerEnvironment>
    so it will look like this :
    <LocalDebuggerEnvironment>PATH=..\..\..\..\cocos2d-x-3.10\build\Debug.win32\</LocalDebuggerEnvironment>

    what this means ?
    the PATH is aimed to the Debug output of the :
    d:\dev\cpp\2d\cocos2d-x-3.10\build\cocos2d-win32.sln
    project form section 1.

    The full test1.vcxproj.user look like this :
    <?xml version="1.0" encoding="utf-8"?>
    <Project ToolsVersion="4.0" xmlns="http://schemas.microsoft.com/developer/msbuild/2003">
      <PropertyGroup Condition="'$(Configuration)|$(Platform)'=='Debug|Win32'">
        <LocalDebuggerWorkingDirectory>$(ProjectDir)..\Resources</LocalDebuggerWorkingDirectory>
        <DebuggerFlavor>WindowsLocalDebugger</DebuggerFlavor>
        <LocalDebuggerEnvironment>PATH=..\..\..\..\cocos2d-x-3.10\build\Debug.win32\</LocalDebuggerEnvironment>
      </PropertyGroup>
      <PropertyGroup Condition="'$(Configuration)|$(Platform)'=='Release|Win32'">
        <LocalDebuggerWorkingDirectory>$(ProjectDir)..\Resources</LocalDebuggerWorkingDirectory>
        <DebuggerFlavor>WindowsLocalDebugger</DebuggerFlavor>
      </PropertyGroup>
    </Project>
    
  6. In test1.vcxproj more stuff needs to be changes:
    They all pointing to the main cocos2d-x engine :

    Line 41: pointing to : "..\..\..\..\cocos2d-x-3.10\cocos\2d\cocos2dx.props" 
    Line 42: pointing to : "..\..\..\..\cocos2d-x-3.10\cocos\2d\cocos2d_headers.props"
    Line 47: pointing to : "..\..\..\..\cocos2d-x-3.10\cocos\2d\cocos2dx.props" 
    Line 48: pointing to : "..\..\..\..\cocos2d-x-3.10\cocos\2d\cocos2d_headers.props"
    Line 48: pointing to : "libcocos2d.lib;librecast.lib;libbullet.lib;"
    Line 89: pointing to : "..\..\..\..\cocos2d-x-3.10\build\Debug.win32\"
    Line 89: pointing to : "..\..\..\..\cocos2d-x-3.10\cocos\2d\cocos2d_headers.props"


    The full test1.vcxproj look like this :
      1
      2
      3
      4
      5
      6
      7
      8
      9
     10
     11
     12
     13
     14
     15
     16
     17
     18
     19
     20
     21
     22
     23
     24
     25
     26
     27
     28
     29
     30
     31
     32
     33
     34
     35
     36
     37
     38
     39
     40
     41
     42
     43
     44
     45
     46
     47
     48
     49
     50
     51
     52
     53
     54
     55
     56
     57
     58
     59
     60
     61
     62
     63
     64
     65
     66
     67
     68
     69
     70
     71
     72
     73
     74
     75
     76
     77
     78
     79
     80
     81
     82
     83
     84
     85
     86
     87
     88
     89
     90
     91
     92
     93
     94
     95
     96
     97
     98
     99
    100
    101
    102
    103
    104
    105
    106
    107
    108
    109
    110
    111
    112
    113
    114
    115
    116
    117
    118
    119
    120
    121
    122
    123
    124
    125
    126
    127
    128
    129
    130
    131
    132
    133
    134
    135
    136
    137
    138
    139
    140
    141
    142
    143
    144
    145
    146
    147
    148
    149
    150
    151
    152
    153
    154
    155
    156
    157
    158
    159
    160
    161
    162
    <?xml version="1.0" encoding="utf-8"?>
    <Project DefaultTargets="Build" ToolsVersion="4.0" xmlns="http://schemas.microsoft.com/developer/msbuild/2003">
      <ItemGroup Label="ProjectConfigurations">
        <ProjectConfiguration Include="Debug|Win32">
          <Configuration>Debug</Configuration>
          <Platform>Win32</Platform>
        </ProjectConfiguration>
        <ProjectConfiguration Include="Release|Win32">
          <Configuration>Release</Configuration>
          <Platform>Win32</Platform>
        </ProjectConfiguration>
      </ItemGroup>
      <PropertyGroup Label="Globals">
        <ProjectGuid>{76A39BB2-9B84-4C65-98A5-654D86B86F2A}</ProjectGuid>
        <RootNamespace>test_win32</RootNamespace>
        <Keyword>Win32Proj</Keyword>
      </PropertyGroup>
      <Import Project="$(VCTargetsPath)\Microsoft.Cpp.Default.props" />
      <PropertyGroup Condition="'$(Configuration)|$(Platform)'=='Release|Win32'" Label="Configuration">
        <ConfigurationType>Application</ConfigurationType>
        <CharacterSet>Unicode</CharacterSet>
        <WholeProgramOptimization>true</WholeProgramOptimization>
        <PlatformToolset Condition="'$(VisualStudioVersion)' == '12.0'">v120</PlatformToolset>
        <PlatformToolset Condition="'$(VisualStudioVersion)' == '12.0' and exists('$(MSBuildProgramFiles32)\Microsoft SDKs\Windows\v7.1A')">v120_xp</PlatformToolset>
        <PlatformToolset Condition="'$(VisualStudioVersion)' == '14.0'">v140</PlatformToolset>
        <PlatformToolset Condition="'$(VisualStudioVersion)' == '14.0' and exists('$(MSBuildProgramFiles32)\Microsoft SDKs\Windows\v7.1A')">v140_xp</PlatformToolset>
      </PropertyGroup>
      <PropertyGroup Condition="'$(Configuration)|$(Platform)'=='Debug|Win32'" Label="Configuration">
        <ConfigurationType>Application</ConfigurationType>
        <CharacterSet>Unicode</CharacterSet>
        <PlatformToolset Condition="'$(VisualStudioVersion)' == '12.0'">v120</PlatformToolset>
        <PlatformToolset Condition="'$(VisualStudioVersion)' == '12.0' and exists('$(MSBuildProgramFiles32)\Microsoft SDKs\Windows\v7.1A')">v120_xp</PlatformToolset>
        <PlatformToolset Condition="'$(VisualStudioVersion)' == '14.0'">v140</PlatformToolset>
        <PlatformToolset Condition="'$(VisualStudioVersion)' == '14.0' and exists('$(MSBuildProgramFiles32)\Microsoft SDKs\Windows\v7.1A')">v140_xp</PlatformToolset>
      </PropertyGroup>
      <Import Project="$(VCTargetsPath)\Microsoft.Cpp.props" />
      <ImportGroup Label="ExtensionSettings">
      </ImportGroup>
      <ImportGroup Condition="'$(Configuration)|$(Platform)'=='Release|Win32'" Label="PropertySheets">
        <Import Project="$(UserRootDir)\Microsoft.Cpp.$(Platform).user.props" Condition="exists('$(UserRootDir)\Microsoft.Cpp.$(Platform).user.props')" Label="LocalAppDataPlatform" />
        <Import Project="..\..\..\..\cocos2d-x-3.10\cocos\2d\cocos2dx.props" />
        <Import Project="..\..\..\..\cocos2d-x-3.10\cocos\2d\cocos2d_headers.props" />
      </ImportGroup>
      <ImportGroup Condition="'$(Configuration)|$(Platform)'=='Debug|Win32'" Label="PropertySheets">
        <Import Project="$(UserRootDir)\Microsoft.Cpp.$(Platform).user.props" Condition="exists('$(UserRootDir)\Microsoft.Cpp.$(Platform).user.props')" Label="LocalAppDataPlatform" />
        <Import Project="..\..\..\..\cocos2d-x-3.10\cocos\2d\cocos2dx.props" />
        <Import Project="..\..\..\..\cocos2d-x-3.10\cocos\2d\cocos2d_headers.props" />
      </ImportGroup>
      <PropertyGroup Label="UserMacros" />
      <PropertyGroup>
        <_ProjectFileVersion>12.0.21005.1</_ProjectFileVersion>
        <OutDir Condition="'$(Configuration)|$(Platform)'=='Debug|Win32'">$(SolutionDir)$(Configuration).win32\</OutDir>
        <IntDir Condition="'$(Configuration)|$(Platform)'=='Debug|Win32'">$(Configuration).win32\</IntDir>
        <LinkIncremental Condition="'$(Configuration)|$(Platform)'=='Debug|Win32'">true</LinkIncremental>
        <OutDir Condition="'$(Configuration)|$(Platform)'=='Release|Win32'">$(SolutionDir)$(Configuration).win32\</OutDir>
        <IntDir Condition="'$(Configuration)|$(Platform)'=='Release|Win32'">$(Configuration).win32\</IntDir>
        <LinkIncremental Condition="'$(Configuration)|$(Platform)'=='Release|Win32'">false</LinkIncremental>
        <CodeAnalysisRuleSet Condition="'$(Configuration)|$(Platform)'=='Debug|Win32'">AllRules.ruleset</CodeAnalysisRuleSet>
        <CodeAnalysisRules Condition="'$(Configuration)|$(Platform)'=='Debug|Win32'" />
        <CodeAnalysisRuleAssemblies Condition="'$(Configuration)|$(Platform)'=='Debug|Win32'" />
        <CodeAnalysisRuleSet Condition="'$(Configuration)|$(Platform)'=='Release|Win32'">AllRules.ruleset</CodeAnalysisRuleSet>
        <CodeAnalysisRules Condition="'$(Configuration)|$(Platform)'=='Release|Win32'" />
        <CodeAnalysisRuleAssemblies Condition="'$(Configuration)|$(Platform)'=='Release|Win32'" />
      </PropertyGroup>
      <PropertyGroup Condition="'$(Configuration)|$(Platform)'=='Debug|Win32'">
        <LibraryPath>$(MSBuildProgramFiles32)\Microsoft SDKs\Windows\v7.1A\lib;$(LibraryPath)</LibraryPath>
      </PropertyGroup>
      <PropertyGroup Condition="'$(Configuration)|$(Platform)'=='Release|Win32'">
        <LibraryPath>$(MSBuildProgramFiles32)\Microsoft SDKs\Windows\v7.1A\lib;$(LibraryPath)</LibraryPath>
      </PropertyGroup>
      <ItemDefinitionGroup Condition="'$(Configuration)|$(Platform)'=='Debug|Win32'">
        <ClCompile>
          <Optimization>Disabled</Optimization>
          <AdditionalIncludeDirectories>$(EngineRoot)cocos\audio\include;$(EngineRoot)external;$(EngineRoot)external\chipmunk\include\chipmunk;$(EngineRoot)extensions;..\Classes;..;%(AdditionalIncludeDirectories);$(_COCOS_HEADER_WIN32_BEGIN);$(_COCOS_HEADER_WIN32_END)</AdditionalIncludeDirectories>
          <PreprocessorDefinitions>WIN32;_DEBUG;_WINDOWS;_USE_MATH_DEFINES;GL_GLEXT_PROTOTYPES;CC_ENABLE_CHIPMUNK_INTEGRATION=1;COCOS2D_DEBUG=1;_CRT_SECURE_NO_WARNINGS;_SCL_SECURE_NO_WARNINGS;%(PreprocessorDefinitions)</PreprocessorDefinitions>
          <MinimalRebuild>false</MinimalRebuild>
          <BasicRuntimeChecks>EnableFastChecks</BasicRuntimeChecks>
          <RuntimeLibrary>MultiThreadedDebugDLL</RuntimeLibrary>
          <PrecompiledHeader>
          </PrecompiledHeader>
          <WarningLevel>Level3</WarningLevel>
          <DebugInformationFormat>EditAndContinue</DebugInformationFormat>
          <DisableSpecificWarnings>4267;4251;4244;%(DisableSpecificWarnings)</DisableSpecificWarnings>
          <MultiProcessorCompilation>true</MultiProcessorCompilation>
        </ClCompile>
        <Link>
          <AdditionalDependencies>libcocos2d.lib;librecast.lib;libbullet.lib;%(AdditionalDependencies);$(_COCOS_LIB_WIN32_BEGIN);$(_COCOS_LIB_WIN32_END)</AdditionalDependencies>
          <OutputFile>$(OutDir)$(ProjectName).exe</OutputFile>
          <AdditionalLibraryDirectories>..\..\..\..\cocos2d-x-3.10\build\Debug.win32\;%(AdditionalLibraryDirectories);$(_COCOS_LIB_PATH_WIN32_BEGIN);$(_COCOS_LIB_PATH_WIN32_END)</AdditionalLibraryDirectories>
          <GenerateDebugInformation>true</GenerateDebugInformation>
          <SubSystem>Windows</SubSystem>
          <TargetMachine>MachineX86</TargetMachine>
        </Link>
        <PostBuildEvent>
          <Command>
          </Command>
        </PostBuildEvent>
        <PreLinkEvent>
          <Command>
          </Command>
        </PreLinkEvent>
      </ItemDefinitionGroup>
      <ItemDefinitionGroup>
        <CustomBuildStep>
          <Command>if not exist "$(OutDir)" mkdir "$(OutDir)"
    xcopy "$(ProjectDir)..\Resources" "$(OutDir)" /D /E /I /F /Y
          </Command>
          <Outputs>$(TargetName).cab</Outputs>
          <Inputs>$(TargetFileName)</Inputs>
        </CustomBuildStep>
      </ItemDefinitionGroup>
      <ItemDefinitionGroup Condition="'$(Configuration)|$(Platform)'=='Release|Win32'">
        <ClCompile>
          <Optimization>MaxSpeed</Optimization>
          <IntrinsicFunctions>true</IntrinsicFunctions>
          <AdditionalIncludeDirectories>$(EngineRoot)cocos\audio\include;$(EngineRoot)external;$(EngineRoot)external\chipmunk\include\chipmunk;$(EngineRoot)extensions;..\Classes;..;%(AdditionalIncludeDirectories);$(_COCOS_HEADER_WIN32_BEGIN);$(_COCOS_HEADER_WIN32_END)</AdditionalIncludeDirectories>
          <PreprocessorDefinitions>WIN32;NDEBUG;_WINDOWS;_USE_MATH_DEFINES;GL_GLEXT_PROTOTYPES;CC_ENABLE_CHIPMUNK_INTEGRATION=1;_CRT_SECURE_NO_WARNINGS;_SCL_SECURE_NO_WARNINGS;%(PreprocessorDefinitions)</PreprocessorDefinitions>
          <RuntimeLibrary>MultiThreadedDLL</RuntimeLibrary>
          <FunctionLevelLinking>true</FunctionLevelLinking>
          <PrecompiledHeader>
          </PrecompiledHeader>
          <WarningLevel>Level3</WarningLevel>
          <DebugInformationFormat>ProgramDatabase</DebugInformationFormat>
          <DisableSpecificWarnings>4267;4251;4244;%(DisableSpecificWarnings)</DisableSpecificWarnings>
          <MultiProcessorCompilation>true</MultiProcessorCompilation>
        </ClCompile>
        <Link>
          <AdditionalDependencies>libcurl_imp.lib;websockets.lib;%(AdditionalDependencies);$(_COCOS_LIB_WIN32_BEGIN);$(_COCOS_LIB_WIN32_END)</AdditionalDependencies>
          <OutputFile>$(OutDir)$(ProjectName).exe</OutputFile>
          <AdditionalLibraryDirectories>..\..\..\..\cocos2d-x-3.10\build\Debug.win32\;%(AdditionalLibraryDirectories);$(_COCOS_LIB_PATH_WIN32_BEGIN);$(_COCOS_LIB_PATH_WIN32_END)</AdditionalLibraryDirectories>
          <GenerateDebugInformation>true</GenerateDebugInformation>
          <SubSystem>Windows</SubSystem>
          <OptimizeReferences>true</OptimizeReferences>
          <EnableCOMDATFolding>true</EnableCOMDATFolding>
          <TargetMachine>MachineX86</TargetMachine>
        </Link>
        <PostBuildEvent>
          <Command>
          </Command>
        </PostBuildEvent>
        <PreLinkEvent>
          <Command>
          </Command>
        </PreLinkEvent>
      </ItemDefinitionGroup>
      <ItemGroup>
        <ClCompile Include="..\Classes\AppDelegate.cpp" />
        <ClCompile Include="..\Classes\HelloWorldScene.cpp" />
        <ClCompile Include="main.cpp" />
      </ItemGroup>
      <ItemGroup>
        <ClInclude Include="..\Classes\AppDelegate.h" />
        <ClInclude Include="..\Classes\HelloWorldScene.h" />
        <ClInclude Include="main.h" />
      </ItemGroup>
      <ItemGroup>
        <ResourceCompile Include="game.rc" />
      </ItemGroup>
      <Import Project="$(VCTargetsPath)\Microsoft.Cpp.targets" />
      <ImportGroup Label="ExtensionTargets">
      </ImportGroup>
    </Project>


  7. Now we are ready to load the test1.sln to Visual Studio c++  in my case 2013
    Once loaded , delete all other projects except our test1 .

  8. Compile the project and hit F5 to run it and walla !


    The project running !
    Size on disk : 82.4 MB (86,466,560 bytes).

    //TODO
    1 .Now all is left to do is to automate this process to python script .
    2. Cross platform.


Monday, January 25, 2016

Multiplayer Card Game using WebSockets,Java Netty Server ,Cocos2d-x-HTML5 - Part 8

Game Client Source code overview

In this post i will teach you about the client class that handles the game logic , as you remember
The "Real" game is played on the server BUT we as players need to visualize the game.
The Game logic in the client have many tasks to do but all the tasks are stateless .
That means in simple words there is no data saved on the client each action made 
will first make request to the server and after confirmation it will make its move , 
of course all the actions will be informed in real time to the other players.
also in our game , this Game layer will take the control of the WebSockets callbacks .

and will handle the building the request JSON protocol and the Decoding the returned
JSON from the server And Act upon the events received .

Here is JSON communication example :

User Login to the game with user name send login request to the server:
The JSON format:
{
"event": 2,
"username": "Pla"
}
The Server confirms the new Player and it send back to the current client and other client:
response JSON format :
{
"winnercards": "",
"winner": -1,
"activecardid": "c47",
"endgame": -1,
"players": [],   //Here is the array of the other players in the room
"deck": "",
"id": 0,
"event": 3,
"activeplayerid": 0,
"registertionnum": 0,
"username": "Pla",
"numcardsleft": 25

}


In this end of this tutorial the login should look like this :
2 browsers open , to simulate 2 players doing login
and each one see the other in real time


GameScene.js

Game logic class 


  1
  2
  3
  4
  5
  6
  7
  8
  9
 10
 11
 12
 13
 14
 15
 16
 17
 18
 19
 20
 21
 22
 23
 24
 25
 26
 27
 28
 29
 30
 31
 32
 33
 34
 35
 36
 37
 38
 39
 40
 41
 42
 43
 44
 45
 46
 47
 48
 49
 50
 51
 52
 53
 54
 55
 56
 57
 58
 59
 60
 61
 62
 63
 64
 65
 66
 67
 68
 69
 70
 71
 72
 73
 74
 75
 76
 77
 78
 79
 80
 81
 82
 83
 84
 85
 86
 87
 88
 89
 90
 91
 92
 93
 94
 95
 96
 97
 98
 99
100
101
102
103
104
105
106
107
108
109
110
111
112
113
114
115
116
117
118
119
120
121
122
123
124
125
126
127
128
129
130
131
132
133
134
135
136
137
138
139
140
141
142
143
144
145
146
147
148
149
150
151
152
153
154
155
156
157
158
159
160
161
162
163
164
165
166
167
168
169
170
171
172
173
174
175
176
177
178
179
180
181
182
183
184
185
186
187
188
189
190
191
192
193
194
195
196
197
198
199
200
201
202
203
204
205
206
207
208
209
210
211
212
213
214
215
216
217
218
219
220
221
222
223
224
225
226
227
228
229
230
231
232
233
234
235
236
237
238
239
240
241
242
243
244
245
246
247
248
249
250
251
252
253
254
255
256
257
258
259
260
261
262
263
264
265
var spriteFrameCache = cc.spriteFrameCache;
var size = null;
var MENU_TAG = 1;
var CENTER_DECK = 2;
var CARD = 3;
var TEXT_INPUT_FONT_SIZE_PLAYER = 20;
 
var GameLayer = cc.Layer.extend({
    cardDeckSprite:null,
    sprite:null,
    listener1:null,
    jsonData:null,
    textFieldUserNameCapton:null,
    currentPlayer:null,
    otherPlayers:[],
    ctor:function (_jsondata) {
        this.jsonData = _jsondata;
        //after succesful login we want to take control on massages coming from server
        //so we attache this new callback function to the websocket onmessage
        ws.onmessage = this.ongamestatus.bind(this);
        ws.onclose = this.onclose.bind(this);
        ws.onerror = this.onerror.bind(this);
        
        this._super();
        size = cc.winSize;        
        return true;
    },
     
    onEnter:function () {       
        this._super();   
            // Make sprite1 touchable
        this.listener1 = cc.EventListener.create({
            event: cc.EventListener.TOUCH_ONE_BY_ONE,
            swallowTouches: true,
            onTouchBegan: function (touch, event) {
                event.getCurrentTarget().invokeTurn(); 
                return true;
            },
            onTouchEnded: function (touch, event) {
            }
        });
        this.setUserObject(this.listener1);
        cc.eventManager.addListener(this.listener1, this);
        spriteFrameCache.addSpriteFrames(res.sprites_plist, res.sprites_png); 
           
        var userName = this.jsonData.username;
        this.textFieldUserNameCapton = new cc.TextFieldTTF("Hello "+userName,
            TEXT_INPUT_FONT_NAME,
            TEXT_INPUT_FONT_SIZE_PLAYER);
        this.textFieldUserNameCapton.setTextColor(cc.color.RED);
        this.textFieldUserNameCapton.x = size.width / 2;
        this.textFieldUserNameCapton.y = size.height-(TEXT_INPUT_FONT_SIZE_PLAYER+100);
        this.addChild(this.textFieldUserNameCapton,10);  
        this.eventHandler(this.jsonData.event);
     },
    onExit:function () {
         
        this._super();
        spriteFrameCache.removeSpriteFramesFromFile(res.sprites_plist);
        spriteFrameCache.removeSpriteFramesFromFile(res.sprites_png);
        cc.eventManager.removeListener(this.listener1);
    }, 
    eventHandler:function(event)
    {
        switch (event) {
            case Events.LOGIN_DONE:
            {
              this.setupCurrentPlayer();
              break;
            }
            case Events.NEW_USER_LOGIN_DONE:
            {
              this.setupOtherPlayerS();
              break;
             
            }
            case Events.PLAY_DONE:
            {
              this.setPlayState();
              break;
             
            }
        }
        this.setTurnMassage();
    },
    setTurnMassage:function()
    {
       var userName = this.jsonData.username;
       var activePlayerId = this.jsonData.activeplayerid;
       if(activePlayerId === this.currentPlayer.id)
       {
           this.textFieldUserNameCapton.setString("Hello "+userName+" Its your turn"); 
       }
       else
       {
           this.textFieldUserNameCapton.setString("Hello "+userName); 
       }
    },
    onCallbackMoveTo:function (nodeExecutingAction,player) {
            this.currentPlayer.updatePlayerNumberOfCardsCaption(this.jsonData.numcardsleft);
            this.otherPlayers[0].updatePlayerNumberOfCardsCaption(this.jsonData.players[0].numcardsleft);       
    },
    setPlayState:function()
    {
        this.currentPlayer.setNewCardById(this.jsonData.activecardid);
        this.updatePlayer(this.currentPlayer,this.jsonData); 
        if(this.jsonData.players.length>0)
        {
            for(var i=0;i<this.jsonData.players.length;i++)
            {
                if(this.jsonData.players[i].event === Events.PLAY_DONE)
                {
                    this.otherPlayers[i].setNewCardById(this.jsonData.players[i].activecardid);
                    this.updatePlayer(this.otherPlayers[i],this.jsonData.players[i]);
                }
            } 
        }
        //handle animation
        var pos = null;
        var activePlayerId = this.jsonData.activeplayerid;
        if(activePlayerId !== this.currentPlayer.id)
        {
            pos = this.currentPlayer.getPosition();
        }
        else
        {
            //TODO this fix this hard coded position getter
            pos = this.otherPlayers[0].getPosition();
        }
        var cardInDeck = this.jsonData.deck;
        this.animateCard(cardInDeck,pos);
    },
    animateCard:function(_cardInDeckId,_pos)
    {
        var cardName =  cards[_cardInDeckId];
        this.cardDeckSprite = new cc.Sprite("#"+cardName);
        this.cardDeckSprite.attr({
                x: _pos.x,//(cc.winSize.width / 2) ,
                y: _pos.y//(cc.winSize.height / 2)
            });
        this.addChild(this.cardDeckSprite,1,CENTER_DECK); //TODO handel removeble when not needed by tag name
        var posMid = cc.p(size.width/2,size.height/2); 
        var action = cc.sequence(
                    cc.moveTo(0.5, posMid),
                    cc.callFunc(this.onCallbackMoveTo,this,this.cardDeckSprite));
        this.cardDeckSprite.runAction(action);          
    },
    invokeTurn:function()
    {
       if(this.currentPlayer.id == this.currentPlayer.activeplayerid)
       {
          var config = {
                        event:Events.PLAY,
                        username:this.currentPlayer.username,
                        id:this.currentPlayer.id,
          };  
          var message = Encode(config);
          ws.send(message);
       }
       else
       {
          console.log("GameScene->invokeTurn() not its turn:"+this.currentPlayer.id); 
       }
    },
    setupCurrentPlayer:function()
    {
        this.currentPlayer = new Player(this.jsonData.id,this.jsonData.username,
                                                        this.jsonData.activecardid);        
        this.updatePlayer(this.currentPlayer,this.jsonData);      
        
        this.addChild(this.currentPlayer,1); 
        this.positionPlayer(this.currentPlayer); 
        if(this.jsonData.players.length>0)
        {
            for(var i=0;i<this.jsonData.players.length;i++)
            {
                if(this.jsonData.players[i].event === Events.NEW_USER_LOGIN_DONE)
                {
                    this.setupOtherPlayer(i);
                }
            } 
        }     
    },
    setupOtherPlayerS:function()
    {
        if(this.jsonData.players.length>0)
        {
            for(var i=0;i<this.jsonData.players.length;i++)
            {
                if(this.jsonData.players[i].event === Events.LOGIN_DONE)
                {
                    this.setupOtherPlayer(i);
                }
            } 
        }
    },
    setupOtherPlayer:function(inx)
    {
        this.otherPlayers[inx] = new Player(this.jsonData.players[inx].id,
                                            this.jsonData.players[inx].username,
                                            this.jsonData.players[inx].activecardid);      
        this.updatePlayer(this.otherPlayers[inx],this.jsonData.players[inx]);
        
        this.addChild(this.otherPlayers[inx],1); 
        this.positionPlayer(this.otherPlayers[inx]); 
        
    },
    updatePlayer:function(_player,jsonObj)
    {
        _player.activeplayerid = jsonObj.activeplayerid;
        _player.activecardid =  jsonObj.activecardid;
        _player.event =  jsonObj.event;
        _player.registertionnum =  jsonObj.registertionnum; 
        _player.winner =  jsonObj.winner; 
        _player.winnercards =  jsonObj.winnercards; 
        _player.numcardsleft =  jsonObj.numcardsleft;          
    },
    positionPlayer:function(_player)
    {
        if(_player.registertionnum === 0)
        {
            _player.attr({
                x: (cc.winSize.width / 2) + 150,
                y: (cc.winSize.height / 2)
            });
            
        }
        else if (_player.registertionnum === 1)
        {
            _player.attr({
                x: (cc.winSize.width / 2) - 150,
                y: (cc.winSize.height / 2)
            });
        }
    },
    ongamestatus:function(e) {
          console.log("GameScene->.ws.onmessage():"+e.data);
          if(e.data!==null || e.data !== 'undefined')
          { 
              this.jsonData = Decode(e.data);
              this.eventHandler(this.jsonData.event);
         }
     }
     ,   
    onclose:function (e) {

    },
    onerror:function (e) {

    }
});  
var EnterWorldScene = cc.Scene.extend({    
    session:null,
    ctor:function (_session) {
        this.session = _session;
        this._super();
        size = cc.winSize;        
        return true;
    },
    onEnter:function () {
        this._super();
        var layer = new GameLayer(this.session);
        this.addChild(layer);
    }    
});


  1. Lines 9 - 15 : members of the class ,
    cardDeckSprite : the sprite that holds the middle deck cards.
    listener1: the cocos2d-x object which listen to touch events from teh user
    jsonData: the JSON data received from the server.
    textFieldUserNameCapton : User name of the current user
    currentPlayer : current user that login
    otherPlayers: array that holds the Other players in the room data  , so wee can see the updates they made 
  2. Lines 16 -26 : class constructor that do several important things ,
    First - it gets the initial JSON data from the server that received when User LOGIN event
    confirmed.
    Second  - 20 to 22 it takes control of the WebSocket build in callbacks . and bind them to
    this class local callbacks .
  3. Lines 32 - 41 : set up Cocos2d-x new EventListener to detect on devices that enable touches
    The touch event and mouse events when it disabled . will invoke the invokeTurn() function .
  4. Lines 47 - 54 : set the user name according to the data received from the server 
  5. Lines 63 -83 : Event Handler function that is triggered first time when user enter the game room in line 54 .
    and then it triggered each time there is massage from the server  line 241.
  6. Line 84 : after each event there is need to update the players with who turn is now 
  7. Lines 99 -  101 : this callback function is called to invoke the players updatePlayerNumberOfCardsCaption function after the animation of the cards is finished. ( see lines 143 - 145 )
  8. Lines 103 -131 : The function is called when the PALY_DONE event is received from the server.
    Lines 105 -117 :  the current player get updated , and also the other players in the room get updated with new states .
    Lines 119 -131 : trigger the animation of the cards.
  9. Lines 133 - 147 : card animation function , animate the moving card into the middle card deck.
  10. Lines 148 - 164 : this function is triggered when player touch the screen or by mouse in desktop or finger on mobile device see paragraph 3 above .
    it will only be invoked if the current player is the active player . that means the one which is his turn in the game .
    then it will prepare the JSON massage to send to the server .
  11. Lines 165 - 183 : setup the current player this is called once when the LOGIN_DONE event
    is received from the server.
  12. Lines 184 - 196 : set up the other players in he game room , this is for us to see what is the status of the other players . this is triggered when the server sends the client NEW_USER_LOGIN_DONE event .
  13. Lines 197 - 207 : create new other player and set it to the otherPlayers client array .
  14. Lines 208 - 217 : update player object with new data.
  15. Lines 218 -235 : position the players in the game room based on order they joined the game
    the data is kept in the JSON registertionnum  member and set to the player registertionnum member .
  16. Lines 236 - 250 : those functions are the new calback functions that are bound to our client
    WebSocket object , see paragraph 2 above .
Thats it!  this is the last part of 8 parts tutorial .
 there are things i still need to fix and refine will do those over time.
I hope it was informative .

Sunday, January 24, 2016

Multiplayer Card Game using WebSockets,Java Netty Server ,Cocos2d-x-HTML5 - Part 7

Game Client Source code overview


As discussed in the previous Server code review posts , here is reminder :
Multiplayer Card Game using WebSockets,Java Netty Server ,Cocos2d-x-HTML5 - Part 1
I wrote about basic principle in MMO games in which the game is 
actually played on the server
That means the client side needs to send information about every future move it does ,
AND also to get confirmation from the server that indicate the move is valid .
The communication is done via WebSocket protocol , and the "language" the client
"talks" to the server. this 
"language" can also be called protocol in our game it is:
JSON structure and Events that both the client and the server must know about.

Example  of JSON massage exchange between the client and the server .


GameConfig.js

The configuration of the game client is defined in this file .
It contains the Events enumeration , the WebSocket Cocos2d-x-js definition and the cards hash-map.And 2 JSON helpers functions


 1
 2
 3
 4
 5
 6
 7
 8
 9
10
11
12
13
14
15
16
17
18
19
20
21
22
23
24
25
26
27
28
29
var WebSocket = WebSocket || window.WebSocket || window.MozWebSocket; 
var ws = null;

var cards = {
    c1:"cardClubsA.png",
    c2:"cardClubsJ.png",
    c3:"cardClubsK.png",
    ...
    ...
    ...
    c53:"cardClubs9.png",
};

Events  = {
    HANDSHAKE_COMPLETE_SUCCESS:1,
    LOGIN:2,
    LOGIN_DONE:3,
    NEW_USER_LOGIN_DONE:4,
    PLAY:5,
    PLAY_DONE:6,
};


var Encode = function(obj) {
       return JSON.stringify(obj);
   };
var Decode = function(obj) {
    return JSON.parse(obj);
};


  1. Line 1 : This is how cocos2d-x defines the Cross platform WebSocket object .
  2. Lines 4 - 12 : The cards hash map (the complete list is in the original source code ).
    The server and the client most have the same keys to the right cards names .
    see:Multiplayer Card Game using WebSockets,Java Netty Server ,Cocos2d-x-HTML5 - Part 3
    Look in the GameManager.java at the bottom of this file for the cards hash in the server side .
    the setCardsHash() fucntion .
  3. Lines 14 - 21 : This is first part of the so called "language" we defined between the Client and the Server.
    Those events are also defined in the server code in Config.java file  :
    Multiplayer Card Game using WebSockets,Java Netty Server ,Cocos2d-x-HTML5 - Part 4

    Line 15  : When Websocket protocol is confirmed.
    Line 16  : Login request form the client .
    Line 17  ; Login is handled , response to client that login is done.
    Line 18  : New User is joined the room.
    Line 19  : Player is done its turn and played.
    Line 20 : Response to all other player and the current player that the turn is done
  4. Lines 24 - 26 : Helper function which convert JSON object to string.
  5. Lines 27 - 29 : Helper function which convert JSON string to object.


Player.js

This class is representing the Player class , The player class members are the same (almost )
As the server Player class , again as you remember the game is played on the server .
With some additional helper functions.


 1
 2
 3
 4
 5
 6
 7
 8
 9
10
11
12
13
14
15
16
17
18
19
20
21
22
23
24
25
26
27
28
29
30
31
32
33
34
35
36
37
38
39
40
41
42
43
44
45
46
47
48
49
50
51
52
53
54
55
56
57
58
59
60
61
62
63
64
65
66
67
68
69
70
71
72
var TEXT_INPUT_FONT_NAME = "Thonburi";
var TEXT_INPUT_FONT_SIZE = 36;
var TEXT_INPUT_FONT_SIZE_PLAYER = 20;
 var Player = cc.Sprite.extend({
    id:null,
    username:null,
    event:null,
    activecardid:null,
    activeplayerid:null,
    registertionnum:null,
    winner:null,
    winnercards:"",
    numcardsleft:null,
    spriteSize:null,
    textFieldUserName:null,
    ctor: function(_id,_username,_activecardid){        
        this.id = _id;
        this.username = _username;
        this.activecardid = _activecardid;
        var cardName = this.getPlayerCardById(this.activecardid);
        this._super("#"+cardName);
       
    },    
    onEnter:function () {        
        this._super();  
        this.spriteSize = this.getContentSize();
        this.setPlayerNameCaption(this.username);
        this.setPlayerNumberOfCardsCaption(this.numcardsleft);
    },
    onExit:function () {        
         this._super();      
    },
    getPlayerCardById:function(_cardId)
    {
        var cardName =  cards[_cardId];
        return cardName;
    },
    setPlayerNameCaption:function(_name)
    {
        this.textFieldUserName = new cc.TextFieldTTF(_name,
            TEXT_INPUT_FONT_NAME,
            TEXT_INPUT_FONT_SIZE_PLAYER);
        this.textFieldUserName.setTextColor(cc.color.RED);
        this.textFieldUserName.x = this.spriteSize.width / 2;
        this.textFieldUserName.y = 0-TEXT_INPUT_FONT_SIZE_PLAYER;
        this.addChild(this.textFieldUserName,2); 
    },
    updatePlayerNumberOfCardsCaption:function(_numberOfCards)
    {
        this.numcardsleft = _numberOfCards
        this.textFieldNumberOfCards.setString("Cards:"+this.numcardsleft); 
    },
    setPlayerNumberOfCardsCaption:function(_numberOfCards)
    {
        this.textFieldNumberOfCards = new cc.TextFieldTTF("Cards:"+_numberOfCards,
            TEXT_INPUT_FONT_NAME,
            TEXT_INPUT_FONT_SIZE_PLAYER);
        this.textFieldNumberOfCards.setTextColor(cc.color.RED);
        this.textFieldNumberOfCards.x = this.spriteSize.width / 2;
        this.textFieldNumberOfCards.y = 0-(TEXT_INPUT_FONT_SIZE_PLAYER+TEXT_INPUT_FONT_SIZE_PLAYER);
        this.addChild(this.textFieldNumberOfCards,2); 
    },
    setNewCardById:function (_cardid)
    {
        //get the right card from the cards hash
        var cardName =  cards[_cardid];
        this.activecardid = cardName;
        //this._super(this.playerSpriteFrameName);
        this.setSpriteFrame(cardName);
    },
});
 

  1. Lines 1 -15 : Variables Definition of the player members . almost the same as the server side
    Player here is reminder:
    Multiplayer Card Game using WebSockets,Java Netty Server ,Cocos2d-x-HTML5 - Part 5
  2. Lines 16 -21 : the player constructure that init the player current card , so the player visual
    will be his current card to play. 
  3. Lines 24 - 28 : The first function according to the Cocos2d-x reference which be triggered
    when the sprite is render to the screen .
    it will invoke 2 functions:
    setPlayerNameCaption - set the player name.
    setPlayerNumberOfCardsCaption - set the number of cards the player left with.
  4. The other functions as helper functions that are self explained.


In  the next  part of the tutorial i will explain about the final client source code
Where all the client game logic is happen :
Multiplayer Card Game using WebSockets,Java Netty Server ,Cocos2d-x-HTML5 - Part 8